Software
Recorder Software
In the previous section, you learned about the hardware used and how to connect signals and Viewer clients together. Now, let's explore how to achieve this in software.
Installation
You can get your copy of Recorder on the FairReplay Cloud. To do this, you will need to register. Learn how to register here.
You have two options for downloading. Either you download a stable version or a preview (beta) version. Preview versions usually include new features, and you are welcome to try them and report any possible bugs.
Download of versions is available here.
The Download button initiates the download of the stable version, while the All versions link directs you to a list of all publicly available versions.
Once the program is downloaded, open the installation file.
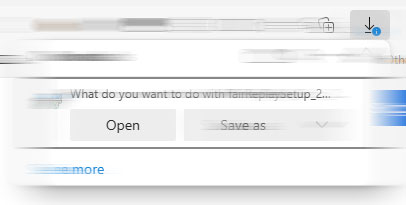
Installation is automatic, and once started, it will install (or replace) Recorder with the newer version that you just downloaded.
Once installation is complete, an icon will appear on the desktop.
How to start the FairReplay Recorder
Double-click on the FairReplay Recorder icon on the desktop. You can also find the program by searching for 'Recorder' in the Windows Start Menu (by pressing the Windows key on the keyboard).
Recommended! Prepare Windows for Best Performance.
First-time Open
When opening the Recorder for the first time, a firewall script will be run, and you will get prompted for admin permissions.
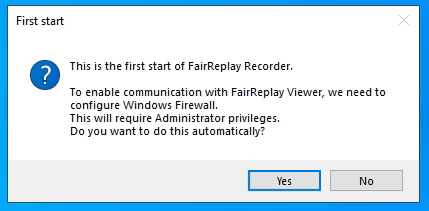
The script that is being run is also available here c:\FairReplay\Recorder\firewall_config.bat
Firewall rules
To ensure the system operates smoothly, certain rules need to be added or enabled on your computer. These rules are automatically edited or added the first time you open the Recorder. You do not have to do anything.
If you experience connectivity issues, ensure that all rules are set up by running the script again with an Administrator user. You can find the script location above. Alternatively, you can run it by going to the View -> Settings menu and clicking the 'Run Firewall Script' button.
- File and printer sharing must be enabled to provide access to video to clients.
- IN TCP 9696 for HTTP API.
- IN UDP 18918 for Multicast discovery of other Recorders.
- OUT UDP 3723 for Multicast discovery of other Recorders (this will soon be deprecated).
Main Session screen
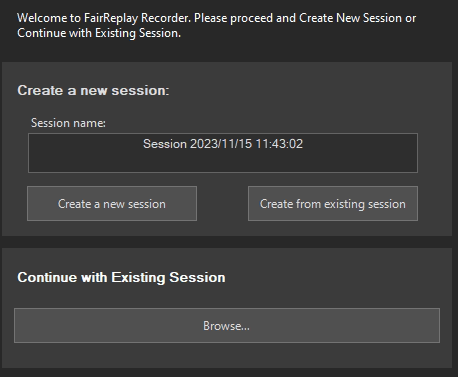
First time - If you've just opened Recorder for the first time, you need to create a new session. Simple enter a session name and press
Not the first time You have multiple options:
-
Create a new session - Give it a name, such as Event day 1 Finals and press
Create a new session -
Create from existing session
2.1 First set a new session name
2.2 Press onCreate from existing sessionand double-click to select a session from which input settings will be copied -
Continue with existing session

New window will open with existing sessions. Double-click on the session you want to continue or select and press
Register / Unregister software
When you first download, install and run, Recorder works in trial mode. It allows you to test the program with 4 inputs and a watermark.
To Register the software, you first need to obtain a valid license key (see this section for details). Once you have the license key, simply click on the
A registration window will open. Enter the license key and click
Internet connection is needed for automatic license activation.
Even if you do not have a valid internet connection, activation is still possible. Simply select Switch to manual registration. A form with two input fields will open.

The flow goes like this:
- Copy your computer ID. Navigate to the FairReplay Cloud on any computer and follow the instructions here.
- Copy the activation key and paste it to your key field.
- Press Register.
How activation works
FairReplay software activation relies on a unique hardware ID created from your motherboard's serial number, CPU, and machine GUID. This ID usually stays the same, unless you change your CPU or motherboard. If you need to make changes, it's best to unregister the program first. You can also revoke the activation on the FairReplay Cloud (see How to Revoke an activation for details).
After activation, a JWT (JSON Web Token) is stored. Your activation is good for 30 days and automatically renews a few days before expiration. Make sure you have an internet connection for this process.
Main interface
Once you are in the session, this interface will appear.
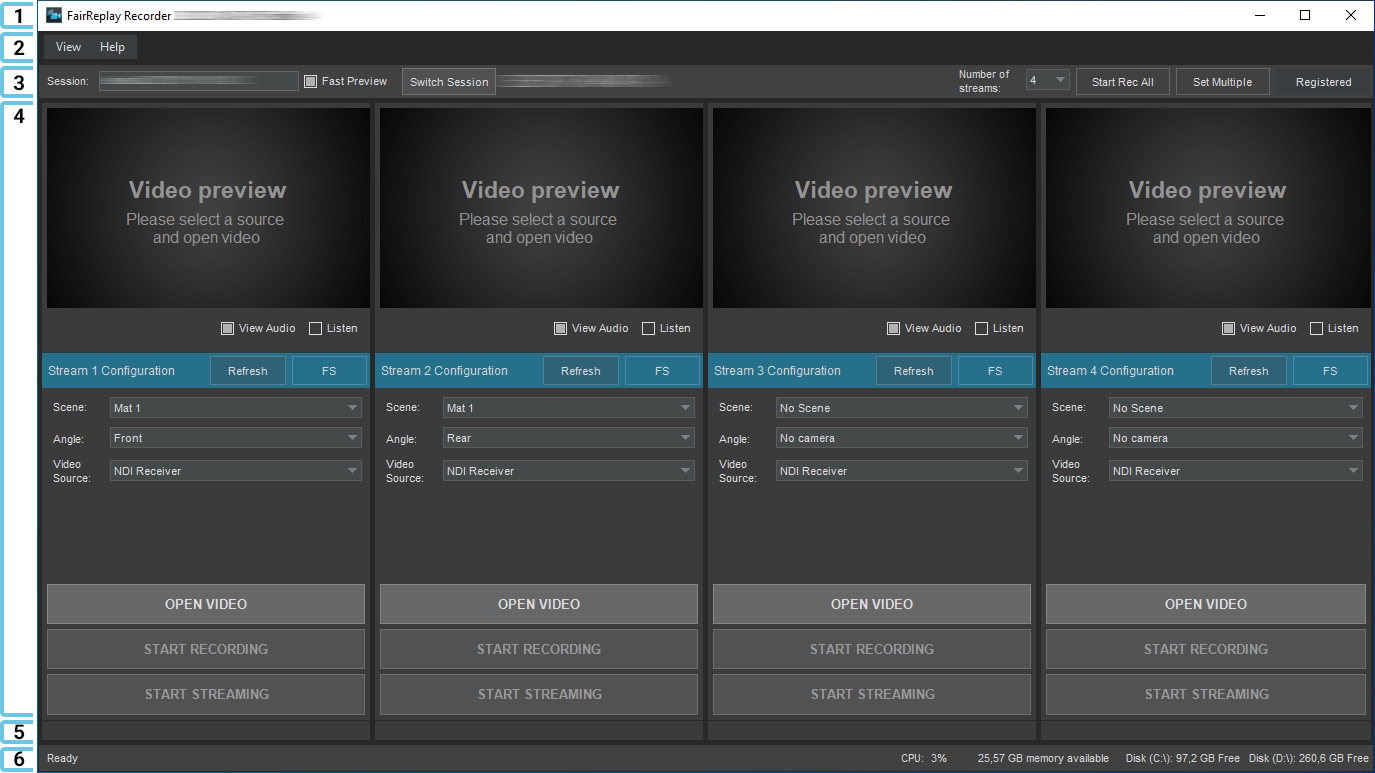
1 - Title bar
You can see your version here.
2 -Menu
You can navigate to different settings/views from here:
- View
- Help
- Manual - open this manual
3 - Info bar
- You can see your current session.
- Fast preview mode - all frames are displayed in preview. You can disable it to gain some performance.
- Switch Session- switch to another session
- Change the number of streams
- Start Rec All- starts recording all opened streams with 2-second delay for each.
- Set multiple- see Set multiple section
- Registered- register or unregister the Recorder here
4 - Input settings
See Input settings section below.
5 - input status bar
If there are any signal issues, such as bad signal, red-colored alerts will be displayed here.
6 - general status
You can monitor CPU usage and available free disk space. During recording, it also provides an estimate of the remaining hours on the specific drive.
Input settings
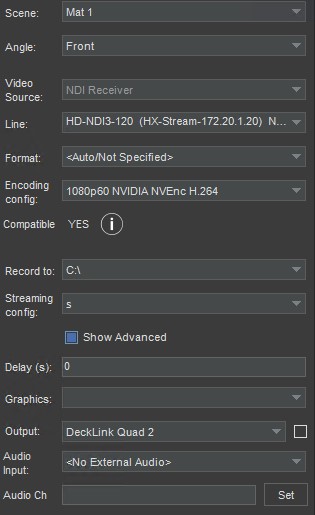
Scene - Multiple scenes such as field 1, field 2 represent separate groups of videos.
Angle - these represent different angles of a scene, such as 'Left goal 16m', 'Left offside', ... in footbal for example.
Video source - this indicates the device that will be used for this input.
Line - In case the device has multiple options where video is taken from (For example SDI or HDMI pins) or which NDI video to use. You can find the most common devices here.
Format - Some devices can set a format to the selected line, locking the device to that specific format. It is a good idea to set a device such as Blackmagic Quad to a specific format.
Encoding config - You can change each input to a different encoding format here. For more information about encoding formats, click here.
Compatible - This status indicates whether the input signal frame rate and the encoding format frame rate are compatible. For example, if you have a 50p signal and want to encode it to 30p, it will display 'NO'.
Record to - You can set a different drive for each input. For example, you can record a proxy encoding to a portable drive to be ready as soon as the event is finished.
Streaming config - Change the streaming profile for this input. Learn more about streaming profiles here.
Delay - This is useful for network inputs where you know the delay. Enter the delay in seconds. This information is used by Viewer clients to synchronize all inputs to same time.
Graphics - You can overlay HTML by selecting a directory where the Recorder searches for HTML files. Go to Settings -> Graphics -> Directory Selector to configure this.
Output - Each input can be sent in its original format to the selected output device. For NDI, the names FR-Stream-1 ... 8 are used.
Audio Input - You can set a different audio device for this input.
Audio Ch - Audio channel mixer. Learn how to use here.
Audio channel mix
For example, if the SDI has ambient sound on channels 1 and 2, a local commentator on channel 3 and international commentator on channel 4, all tracks will be recorded by default. For example, if you would like to have:
- On channel 1: combination of the original channel 1 (ambient sound) and local commentator (channel 3)
- On channel 2: the original channel 2
You would input:0+2, 1
Channel numbers start with 0 - channel 1 is marked as 0, channel 2 as 1, and so on.
Do not change audio settings while recording!
Set multiple
With this feature, you can set multiple input configurations to a selected option. Disk drive, encoding configuration, streaming configuration, and format can be set from this screen.
You can also
Start and stop recording
You can start and stop recording and streaming anytime you want. We do recommend starting recording when all settings are configured and the signal is present. It's also advisable to star recording with a 2-second delay to avoid losing any frames.
Encoding Configuration
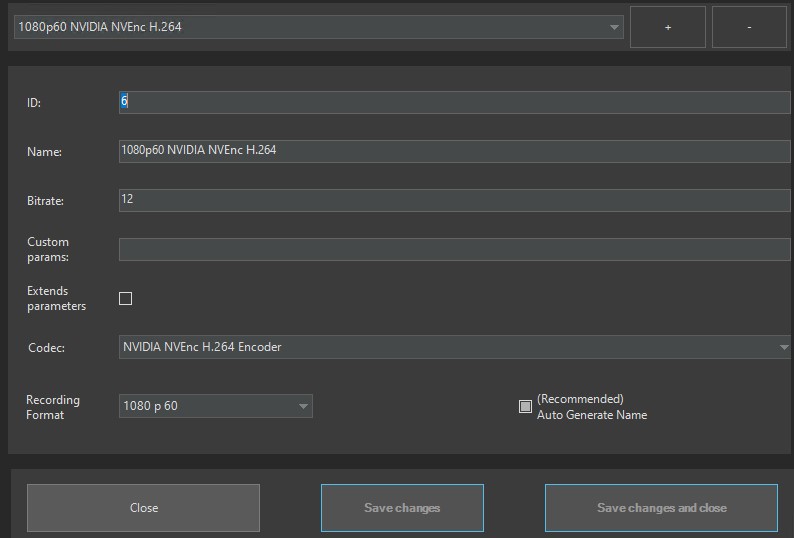
ID - numerical id of the encoding
Name - You can customize the encoding name
Bitrate - measured in Mbps. We recommend a minimum of 12 Mbit/s with h264 codec for 1080p50 video,
and for 720p50, a minimum of 8 Mbps.
You can quickly calculate the needed space in gigabytes for one hour by calculating inputs * bitrate * 3600 / 8 / 1024.
With a 12Mbps bitrate, this is approximately 5GB per hour per stream.
Custom params - if you have some specific options, such as GOP, you can set most of ffmpeg options here. Let us know if you need specific settings and we can help.
Codec - choose the codec that will be used for this video. We recommend NVIDIA NVEnc h.264. H.265 also works; in that case, you can then lower the bitrate by 30%. Please note that h.265 may use more resources.
We also support Intel QuickSync and AMD AMF hardware encoders, but the best quality is achieved with NVIDIA.
Recording format - you can keep the format unchanged or, for better stability, select a specific format to lock to a particular frame rate. This is particularly useful for network streams, as frames are added or removed to match the selected format. It is also recommended to record to progressive (it does deinterlace) for smoother and more accurate playback in Viewers when moving frame by frame.
How To Navigate/Change/Edit the Encoding Config?
Drop Down to select which Encoding Config you want to Edit.
Streaming Configuration
Setup streaming to Youtube, Facebook, X, LinkedIn, Twitch, ...
KEY - Auto generated key. You can rename it
URL - Link to the streaming platform (example: url for youtube)
STREAM KEY - Your Streaming Key. Used for secure streaming.
Platform you want to stream to will provide you with a URL and a STREAM KEY!
How To Navigate/Change/Edit the Streaming Config?
Drop Down to select which Streaming Config you want to Edit.
Scenes and angles
Scenes and angles are meta information used by client software such as Viewer and Auto video cutter. You can edit scenes and angles in a separate window by navigating to View -> Scenes and angles in the menu.

Scene - For example, if you have multiple fields in a football game, you can create scenes like Game 1, Game 2, and Game 3. In multidisciplinary sports, you can set scenes such as Field 1, Field 2. For a reality show, you might set scenes like Room 1, Room 2, Room 3.
Angle - angles in a football game can be, for example Goal Left, Goal Right, 16m left/right, Center.
Change session from existing
If you click
Settings
Graphics directory selector - you can add multiple directories to this list. Each directory will be searched for .html files which will then be available for each input for overlay.
Share and unshare folder - each drive can be selected for recordings. To make recordings available for clients such as FairReplay Viewer, these folders needs to be shared. You can share and unshare with these two buttons.
Default recording drive - for each new session, this drive is selected by default.
Record low res proxy file - each input has its own low-res 360p file with a low bitrate. It takes a bit more resources, but the performance of Viewers and the network is greatly increased. Please note that Nvidia encoder has a limit of 5 encodings for non-professional models. This means you can record 2 inputs with proxy mode enabled, the third one will fail.
Use Timecode from SDI - SDI timecode will be embedded in the recording stream.
Use telemetry - this is an opt-in option for you to send us usage logs, including the number and length of recordings. No video is being sent to us.
Allow start recording when duplicate scene-angle combination - by default, Recorder does not allow recording if a unique combination of scene + angle is selected for all inputs.
Time sync - it opens program and asks you for permission to set the system time. If you use recordings with the Video cutter, it is very important to pair recordings with scoreboard data with the correct time. Please note that we observed up to 100ms of system time drift on computers.
Advanced time sync settings - by default, time.fairreplay.com is used to get the current time. You can change this to, for example, http://[IP-other-recorder]:9696/api/isotime where IP-other-recorder is either the IP or hostname of another Recorder in same network.
Recordings

ID - ID of the Recording.
Created - Date when the Recording was Created.
Scene - Scene of the Recording (click for more details).
Angle - Angle of the Recording (click for more details).
Path - File location where the Recording is saved on the disk
Where are configuration files and database
Older versionsc:\Users\[your user]\AppData\Roaming\FairReplay\
c:\ProgramData\FairReplay\
Most common input sources and lines
Blackmagic Quad 2 has each input in separate input. There is only one line for each input.
NDI has each source in a different Line. Press